Lobby & Waiting Room
You can now enable a Lobby (Waiting Room) for meeting events, where all attendees will wait in a lobby before being let into the call. If enabled, all attendees and panelists will need approval from the host(s) before joining the call.
There is an unlimited capacity limit in the lobby waiting room, but a 125 attendee capacity limit in the meeting room. You can utilize this feature to allow those attendees over the 125 cap to wait in the lobby for a spot to become available in the meeting room.
Controls and Settings
Creating a Waiting Room
The waiting room feature is currently available in meeting events and can be turned on in the event dashboard, on a per-event basis. The default setting is 'off' for all meeting events, and dashboard admins or collaborators must manually enable the setting when configuring their event in the dashboard.
Closing a Waiting Room
Dashboard admins or collaborators can close waiting rooms from the event dashboard and live in the meeting room event environment and assigned hosts can close them from the event dashboard.
From the event dashboard
Dashboard admins and collaborators can change the settings from the event dashboard.

Note: You cannot turn off the lobby of an ongoing meeting from the dashboard. You must sign into the meeting room and turn it off live in the event environment.
Live in the meeting room
Assigned meeting hosts can change the settings from the live meeting room event.
From the side controls: Select 'Close Lobby'

Note: Closing the lobby from the live event environment will admit all attendees to the meeting.

Admitting participants
As the meeting host in the live event, you can admit attendees one by one, or hold all attendees in the Waiting Room and admit them all at once.
There is an unlimited capacity limit in the lobby waiting room, but a 125 attendee capacity limit in the meeting room. You can utilize this feature to allow those attendees over the 125 cap to wait in the lobby for a spot to become available in the meeting room, and admit attendees when spots become available.
Admit attendees one by One

If there are over 125 users in the lobby, you can select users to join the meeting room up until you've reached the limit of 125 attendees in the meeting. This 125 capacity includes any attendees already in the room like hosts, panelists, speakers, etc.
Admin attendees all at once

If there are over 125 users in the lobby, and you select 'Admin All' the system will randomly select users to join the meeting room, to the limit of 125 attendees in the meeting. This 125 capacity includes any attendees already in the room like hosts, panelists, speakers, etc.
Note: You cannot revoke an attendee's entry or deny them once they have been accepted.
Once an attendee is admitted, they will be able to join the meeting from there on out (should they refresh or leave the meeting and come back).
If you need to take action on a disruptive attendee,
check out this resource on Attendee management.
Denying participants
As the meeting host in the live event, you can deny attendees one by one.

Note: Attendees can attempt to join three times before they are blocked from joining.
Attendee Experience
The waiting room access applies to attendees and panelists (hosts will not follow the experience below).
Joining
If the waiting room is enabled, all attendees will program their video and audio settings ahead of joining, and they the pop up below will appear until they are accepted or denied entry.

Accepted Entry
Once attendees are accpeted and granted access, they will join the meeting room.
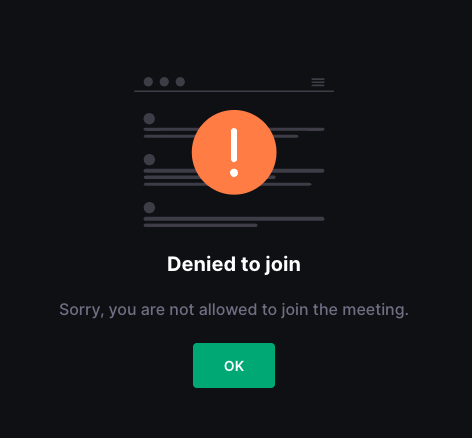
Denied Entry
Attendees will receive a notification that they have been denied entry to join the meeting room. They can select 'Ok' or they can 'Try Again'.

Attendees can attempt to join from the waiting room three times, and if they are denied by the host on the third attempt, they will be blocked from entering.
This is the screen they will see if they are blocked from entering:
Live In Event
Attendees and panelists do not see the attendees in the lobby or waiting room, and cannot take any action on those in the waiting room - to accept or deny them entry.